
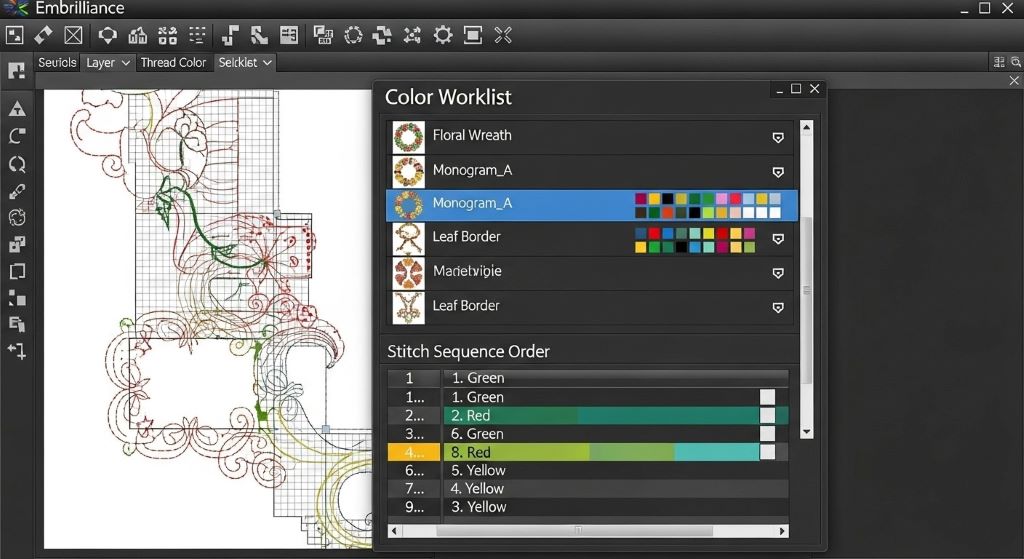
Embrilliance software transforms simple embroidery designs into stunning layered masterpieces. This powerful digitizing platform enables embroiderers to create dimensional effects that elevate their projects. Understanding layering techniques opens endless creative possibilities for both beginners and experienced stitchers.
Layered embroidery adds depth and visual interest to designs. Multiple stitch layers create shadows, highlights, and textured surfaces. Therefore, mastering these techniques separates amateur work from professional-quality embroidery.
Understanding Layered Embroidery Basics
Layered embroidery involves stacking multiple design elements to create depth. Each layer stitches in sequence, building upon previous layers. This technique mimics traditional appliqué while offering greater precision and detail.
The software controls stitch order, density, and placement. Additionally, users can adjust thread colors for each layer to enhance dimensional effects. Proper planning ensures layers stitch correctly without causing registration issues.
Design complexity determines the number of layers needed. Simple projects might use two or three layers, while intricate designs require ten or more. However, excessive layering can create bulk and stiffness in finished embroidery.
Getting Started with Embrilliance Essentials
Embrilliance Essentials provides the foundation for creating layered effects. This entry-level software includes basic editing and layering tools. Users can combine existing designs and manipulate individual elements.
First, open Embrilliance and create a new blank design. Import the designs you want to layer using the merge function. The software displays each design element separately in the color worklist.
Navigate to the color worklist panel on the right side of the screen. This panel shows every color and stitch sequence in your project. Therefore, understanding this panel is crucial for successful layering.
Drag and drop colors within the worklist to change stitch order. Elements at the top stitch first, while bottom elements stitch last. This simple reorganization creates basic layering effects immediately.
Creating Background Layers for Depth
Background layers establish the foundation for dimensional designs. These layers typically use lighter colors or tone-on-tone stitching. They provide subtle texture without overwhelming foreground elements.
Select a fill stitch design for your background layer. Reduce the density to 70-80 percent of normal to prevent excessive bulk. Lower density also allows foreground layers to sit properly on the fabric surface.
Position your background element to extend slightly beyond foreground designs. This overlap ensures complete coverage and prevents gaps between layers. Additionally, extending backgrounds creates shadow effects that enhance depth perception.
Consider using different stitch angles for background and foreground layers. Contrasting angles catch light differently, emphasizing the layered effect. Moreover, this technique reduces the risk of thread breaking from excessive density.
Building Midground Elements
Midground layers bridge background and foreground elements. These transitional layers add complexity and visual flow to designs. They often feature medium-density fills or decorative stitches.
Import or create your midground design elements within Embrilliance. Adjust sizing to ensure proper proportions relative to other layers. The midground should partially overlap both background and foreground for cohesion.
Experiment with different fill patterns for midground layers. Tatami fills work well for medium-density areas, while pattern fills add texture. However, avoid overly dense stitches that create excessive bulk.
Color selection significantly impacts layered effects. Choose midground colors that complement both background and foreground hues. Gradual color transitions create smooth dimensional effects, while contrasting colors produce dramatic impact.
According to Threads Magazine, proper color layering can make embroidery designs appear three-dimensional even on flat fabric surfaces.
Developing Foreground Focal Points
Foreground layers contain primary design elements that draw viewer attention. These layers use full-density stitching for maximum impact. Bold colors and defined edges characterize successful foreground elements.
Place foreground elements strategically within your design composition. The rule of thirds applies to embroidery design just as it does to photography. Therefore, position focal points off-center for more interesting layouts.
Use satin stitches or high-density fills for foreground elements. These stitches create smooth, raised surfaces that stand out from underlying layers. Additionally, satin stitches provide clean edges that define shapes clearly.
Add detail stitches as final foreground layers. Running stitches, backstitches, or decorative outlines enhance dimension. These details stitch last, ensuring they appear on top of all other elements.

Using Embrilliance Enthusiast for Advanced Layering
Embrilliance Enthusiast unlocks professional layering capabilities. This mid-tier software includes editing tools for manipulating individual stitches. Users gain greater control over density, underlay, and stitch direction.
The program features stitch editing that allows precise adjustments to each layer. Select individual color blocks and modify their properties independently. This capability enables custom density settings for optimal layering results.
Enthusiast includes the ability to add underlay to specific layers. Underlay stitches stabilize fabric and prevent distortion. However, excessive underlay combined with multiple layers creates unwanted bulk.
Create custom stitch angles for each layer using the angle adjustment tools. Different angles prevent stitches from directly stacking, which reduces thread breaking. Moreover, varied angles enhance the visual separation between layers.
Mastering StitchArtist for Custom Layered Designs
StitchArtist represents Embrilliance’s premium digitizing software. This powerful tool enables creation of original designs with sophisticated layering. Users can digitize from scratch or convert artwork into embroidery files.
Import your artwork or photograph into StitchArtist. The software’s auto-digitizing features create initial stitch layouts. However, manual adjustments produce superior layered effects.
Use the polygon tool to create individual design elements for each layer. Build your design from background to foreground, digitizing one layer at a time. This methodical approach ensures proper stitch order and overlap.
Adjust pull compensation for each layer independently. Layers with different stitch densities require varying compensation amounts. Therefore, testing on sample fabric before final stitching prevents disappointment.
Creating Appliqué Layers
Appliqué layering combines fabric pieces with embroidery stitching. This technique creates dramatic dimensional effects with minimal stitching. Embrilliance supports both traditional and reverse appliqué methods.
Design appliqué layers with placement stitches, tack-down stitches, and covering stitches. The placement stitch marks fabric position, while tack-down secures the appliqué. Covering stitches hide raw edges with satin or decorative stitches.
Position appliqué layers strategically within your overall design. Fabric layers add significant dimension without excessive stitch counts. Additionally, appliqué reduces stitching time compared to fully digitized dimensional effects.
Combine appliqué with embroidered layers for maximum impact. Place embroidered details on top of appliqué pieces. This combination creates professional-looking results that rival commercial embroidery.
Optimizing Layer Sequence for Best Results
Proper layer sequencing prevents common embroidery problems. Incorrect stitch order causes registration issues, thread breaks, and poor design quality. Therefore, careful planning before stitching saves time and materials.
Always stitch backgrounds first, moving progressively to foreground elements. This order allows each layer to build naturally upon previous stitches. Violating this principle often results in distorted or misaligned designs.
Group similar elements within the same layer when possible. Consolidating layers reduces color changes and simplifies the stitching process. However, maintain separation between elements requiring different stitch densities or angles.
Test your layered design on sample fabric before final projects. This practice reveals potential issues with density, registration, or color selection. Moreover, testing allows adjustments without wasting premium materials or project pieces.
Adjusting Density for Layered Projects
Stitch density dramatically affects layered embroidery quality. Excessive density creates stiff, board-like results. Insufficient density allows base fabric to show through stitching.
Reduce background layer density to 70-80 percent of standard settings. This reduction prevents excessive bulk while maintaining adequate coverage. Additionally, lower density allows foreground layers to stitch smoothly.
Maintain normal density for midground layers unless they overlap significantly with other elements. Overlapping areas may require slight density reduction. Therefore, examine each color block individually when adjusting settings.
Use full density for foreground focal points and detail stitches. These final layers should appear crisp and well-defined. However, monitor total stitch count to ensure your machine can handle the design.
According to WIRED’s coverage of textile innovation, modern embroidery software has revolutionized how crafters approach dimensional design work, making professional techniques accessible to home users.
Troubleshooting Common Layering Issues
Registration problems occur when layers don’t align properly. This issue typically results from inadequate stabilization or excessive fabric movement. Additionally, incorrect hooping tension causes registration errors.
Thread breaks increase with multiple dense layers. Reduce upper thread tension slightly when stitching layered designs. Moreover, ensure your needle size appropriately matches thread weight and fabric type.
Fabric puckering indicates stabilization problems or excessive density. Add additional tearaway or cutaway stabilizer beneath layered projects. Furthermore, reducing background density often eliminates puckering issues.
Design distortion suggests pull compensation needs adjustment. Increase compensation for dense layers and decrease it for lighter stitching. Therefore, test various settings on sample fabric to find optimal values.
Saving and Organizing Layered Designs
Proper file management ensures you can modify layered designs later. Save working files in Embrilliance’s native format before exporting. This practice preserves all layers and editing capabilities.
Export finished designs in formats compatible with your embroidery machine. Common formats include PES, DST, JEF, and EXP. However, maintain original working files for future modifications.
Create descriptive file names that indicate layer count and complexity. This organization helps locate specific designs quickly. Additionally, note any special requirements like stabilizer type or fabric recommendations.
Back up your design files regularly to prevent data loss. Cloud storage services provide convenient backup solutions. Moreover, keeping multiple copies protects against computer failures or accidental deletions.
Conclusion
Creating layered embroidery effects with Embrilliance software opens exciting creative possibilities. Understanding background, midground, and foreground principles enables professional-quality results. Proper density adjustment, stitch sequencing, and color selection transform simple designs into dimensional masterpieces. Therefore, practice these techniques regularly to develop your skills. Start with basic two-layer projects before advancing to complex multi-layer designs. With patience and experimentation, you’ll soon create stunning layered embroidery that stands out from ordinary stitching.
Frequently Asked Questions
What Embrilliance software do I need to create layered embroidery effects?
Embrilliance Essentials allows basic layering by merging and reordering designs. However, Enthusiast provides better control over density and stitch properties. StitchArtist offers complete digitizing capabilities for advanced custom layered designs from scratch.
How many layers should I include in an embroidery design?
Most effective layered designs use three to five layers including background, midground, and foreground elements. Simple projects work well with two layers, while complex designs may require up to ten. However, excessive layers create bulk and increase stitch count significantly.
Why does my layered embroidery look flat instead of dimensional?
Flat appearance typically results from insufficient contrast between layers. Use different stitch angles, varying densities, and contrasting colors to enhance depth. Additionally, ensure proper layer sequencing with backgrounds stitching first and details stitching last.
How do I prevent thread breaks when stitching multiple layers?
Reduce background layer density to 70-80 percent to minimize bulk. Lower upper thread tension slightly and use appropriate needle size for your thread weight. Moreover, ensure adequate stabilization and avoid placing too many dense layers in the same area.
Can I convert existing single-layer designs into layered effects?
Yes, Embrilliance allows you to separate design elements and reorder them for layering. Use Essentials to ungroup designs and rearrange color blocks. However, you may need Enthusiast or StitchArtist to adjust density and add underlay for optimal layered results.
Related Topics:
Unlocking the World of Entertainment: Accessing Popcornflix on Devices
Popcornflix and Chill: Date Night Edition